
PowerApp
How to Create Filtered Relational Drop-downs with Choices in PowerApps


Relational drop-downs are something that come up quite frequently but aren’t always straight forward.
PowerApps gives you a relatively friendly manner of creating simple relational drop-downs when using the “Depends On” functionality but this falls apart when utilizing anything but simple fields (text, number, etc.) and trying to further drill down into filtered results. You may have noticed that when you start trying to use Choice fields to filter your drop-downs on, it is not inherently possible.
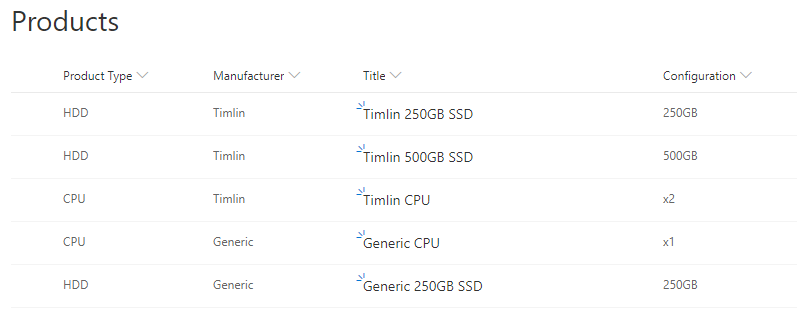
In our example, we will work off a mock Products list in SharePoint. The SharePoint Products list will be made up of the following columns (yours can vary):
- Product Type – Choice field – Choices: HDD, CPU
- Title – Text (Product Name)
- Manufacturer – Choice field – Choices: Timlin, Generic
- Configuration – Choice field – Choices: 250GB, 500GB, x1, x2
Below is a screenshot of how this list looks and some sample data we have input for testing.
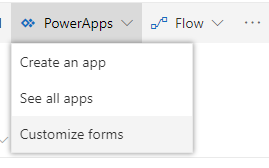
Once your list is setup, we can hop straight into PowerApps. If you aren’t familiar with how to get started, simply click on the “PowerApps” button followed by the “Customize Forms” button.
We arranged our fields in the PowerApp to go in the following order: Product Type, Manufacturer, Configuration and Title.
The end goal of this is to have it so the end-user will go through the menu one by one and be provided a final filtered list of products that follow the selected Type, Manufacturer, and Configuration.
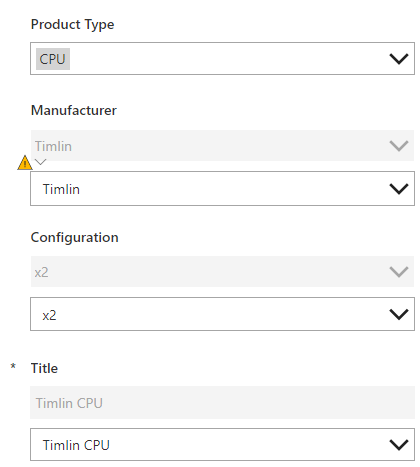
You might notice from the screenshot of the layout of the PowerApp above that there are duplicate fields. The reason for this is that the more advanced filtering we will be doing on the fields does not work when using the out of the box choices column in PowerApps.
To circumvent this, we unlock each of these data cards and add a “Dropdown” control (to make things easier, set “AllowEmptyField” to true in the properties of each drop-down we add).
Currently, the fields are disabled just as a visual aid but in normal circumstances, you can set the value of the fields to the value of the drop-down and have them hidden in the background so nothing is visually different to the end-user. In our example, Product Type won’t need to be filtered in any way so we can leave that card alone.
Our options in Product Type are CPU and HDD.
In this instance and given the sample data above, when we select “CPU” we will want to see both the Timlin and Generic manufacturers (we will filter this even though each manufacturer has a CPU, there will be instances in production where a manufacturer will exist that does not offer a CPU product).
To filter the Manufacturer drop-down based on the Product Type, we can set it’s “Items” property to the following formula (keep in mind that the numbers or names of the Data Cards may vary on your application):
Distinct(Filter(Products, ‘Product Type’.Value = DataCardValue2.Selected.Value),Manufacturer.Value) – DataCardValue2 is associated with Product Type
Using the “Distinct” operation, we ensure that we do not pull back the same manufacturer more than once. The second parameter following the filter (Manufacturer.Value) is the return value, which in this case is the Manufacturer value that we want.
The Filter operation is ensuring that we are only getting products in the list that match the product type we selected in the first field. One other thing we want to do on this drop-down is to set up a variable that stores the filtered results so we can easily filter our next field. To do so, we can change the “On Change” operation to the following formula:
Set(ManufacturerFilteredProducts, Filter(Products, Manufacturer.Value = DataCardValue4.Selected.Value)) – DataCardValue4 is associated with Manufacturer
This will provide us with the list of products we have filtered on Product Type and on Manufacturer.
Next, we will want to set up our Configuration drop-down to only show us products that have the Product Type and Manufacturer the user has selected. To do so, we can set the “Items” property on the Configuration drop-down we added (the control, not the field) to the following:
Distinct(Filter(ManufacturerFilteredProducts,’Product Type’.Value = DataCardValue2.Selected.Value),Configuration.Value)
We should now have a drop-down with only the results that match the Product Type and Manufacturer the user chose in the previous two fields.
Lastly, we will want to make sure that when a user chooses a configuration that the product names that appear in the “Title” drop-down are those that match all of the previous filters. To do so, we set the “On Change” property of the Configuration drop-down to a new variable (FinalFilteredProducts).
This variable will filter the results we stored in ManufacturerFilteredProducts based on the Configuration value the user chooses and store the results for use in the Title/Product Name field. We can do this via the formula below:
Set(FinalFilteredProducts, Filter(ManufacturerFilteredProducts, Configuration.Value = DataCardValue3.Selected.Value)) – DataCardValue3 is associated with Configuration
Finally, we want to make sure that the only Titles we get back are for products that are related to all three previous drop-downs. This is simply just the Title rows in the FinalFilteredProducts variable we just created. To do this, set the “Items” property on the custom Title drop-down to the following:
FinalFilteredProducts.Title
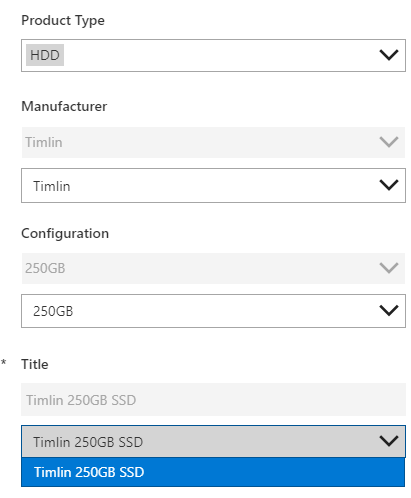
This should produce a fully filtered list of choices for the products (as shown in the original screenshot). Given the sample data, if a user were to look at SSDs made by Timlin with a 250GB capacity, the only title we should get back is the “Timlin 250GB SSD”, which we do (shown below).
Interested in diving in deeper to Filtered Relational Drop-downs? Reach out to our team here to set up a free consultation call.